I tried my for loop scripting ability on my own and came up with the following:
var a = 'Betty';
var b = 'Thomas';
var c = 'Peter';
var d = 'Jane';
var classNames = new Array (a, b, c, d);
for (var i = 0; i < classNames; i++)
{
document.write(classNames[i] +
'enjoyed the movie Cars 2 very much.');
}
I haven't found a way to create a string array in Javascript, but I will keep searching. Therefore, I had to create several variables that contained strings within them. This code is supposed to write the following:
Betty enjoyed the movie Cars 2 very much.
Thomas enjoyed the movie Cars 2 very much.
Peter enjoyed the movie Cars 2 very much.
Jane enjoyed the movie Cars 2 very much.
The statement document.write(classNames[i] + 'enjoyed the movie Cars 2 very much.'); I believe is equivalent to a print statement in Java or Python. Strings in Javascript are embedded in single quotations.
This website helped me understand strings in Javascript. http://www.quirksmode.org/js/strings.html#charat
Goals : 1. Photoshop Text Mystery Puzzle-Coming Soon!
2. Learn about opacity, font, color, and animation techniques in
Photoshop Javascipt.
3. Create gif animation script that uses the techniques in Goal #2.
Monday, March 28, 2011
Week 9- Best Tutorial Recommendation- For Loops in Photoshop Javascript
This website: http://babbage.cs.qc.edu/courses/cs081/Javascript_Tutorial/index.xhtml#navTarget_2
has the fundamental breakdown on Javascript concepts.
The example in this tutorial discusses that for loops can be employed to use arrays in various ways. Addition of simple variable numbers in an array is the utilization for this example. First, the selected numbers have to be chosen and put into an array, which is not shown in the example. The variable sum will hold the added amount of all the variables from within the array. Sum has been declared at the top of the for loop to be recognized and used later on. The variable i within the for loop is a generic variable used as a counter also called a loop control variable. The variable i is used three times in the first line of the for loop. The value is always set to zero because that is the number programmers always use to and signifies the beginning of array elements and for loops . An ending has to be specified as well. This for loop can run the number of times stated in the array defined, which is four. The method call anArray.length measures the amount of elements in the for loop, which becomes the amount of times the for loops functions. Lastly, i++ is the code that specifies that i should add one to every element in the array and add the element values, as demonstrated by the linking of i to the array in the statement anArray[i].
This is the full code I came up with after I changed the numbers in the example and reviewed the loops and arrays section also provided on the website. I set up four variables for numbers in the array and the array itself. I made the mistake the first time of not properly declaring the type var for the loop and the array and the new type for the array as well. The types of everything have to be defined in a similar manner to regular Java programming, which I learned from my Java class last semester and made me familiar with for loops and their functions.
//For loop array example with a result of 135.
Every element value in the array is added to the
one before to come out with the result of 135.
var a= 20; //element 0, #1
var b= 35;// element 1, #2
var c= 55; //element 2, #3
var d = 25; //element 3, #4
var anArray = new Array (a, b, c, d);
var sum = 0;
for (var i = 0; i < anArray.length; i++)
{
sum = sum + anArray[i];
}
Wednesday, March 23, 2011
Week 9- Best Photoshop Scripting Tutorial
The best tutorial in existence is the different documentation for Photoshop Scripting. http://www.adobe.com/devnet/photoshop/scripting.html I tried to find a decent Photoshop scripting video tutorial, but most were inappropriate with loud music over them or were insufficient.
This tutorial from http://www.earthboundlight.com/phototips/your-first-photoshop-script.html is the best one I have found so far. It is detailed and thorough.
It walks the "student" through the simple basics of JavaScript. The first part of the tutorial is a detailed listing of file extensions (from the documentation), as well as detailed locations of where to put one's scripts and how to access them (also from the documentation). The tutorial explains the components of Javascript for people that are unfamiliar with them. Some tutorials require that one have specific knowledge beforehand to understand any of the concepts. Also this website actually gives a link to the documentation, which is convenient and encourages the student to explore further and learn themselves.
A text editor is recommended to write JavaScript. I think this is useful for the same reason we use it for Mel in Maya, to save code in steps and versions. I found my ExtendScript Toolkit already on my computer while searching for how to find it on the internet. However, I will have to take tutorials on the toolkit because trying to run for loops from examples on the internet just gave me errors. EarthBoundLight has a tutorial for the toolkit.
Lastly, the tutorial demonstrates the use of some code, specifying what it does and proper syntax and punctuation for general JavaScript code. Although I knew most of the content in this tutorial, I think it provides a solid basis for JavaScript in general for people who are completely unfamiliar.
Saturday, March 19, 2011
Week 8-Opening Scene Animatic for National Treasure
One of the special features that I found interesting on the National Treasure DVD (2-Disc Collector's Edition) was the Opening Scene Animatic. It was narrated by Director Jon Turteltaub.
An animatic is produced by an animator who recreates a part or a scene of a script in animations. It is an animated storyboard so the director can see whether not camera angles would work or the scenes in the script would function without changes. It also determines what special effects will be used in the film.
In this animatic, the goal was to have the entire animation consist of one continuous piece of footage. The goal almost panned out, but one cut was necessary. Several visual effects transitions were used to quicken the pace of the story sequence. The spacious locations and the sudden change in time period was chosen for this sequence and therefore, illusionistic transitions had to be employed. For example, the action would focus on an object for the end of one location/timeperiod and the beginning of another such as the moon, a torch, a ring, a fast-moving chariot, or a stone wall.
Utilizing animatics is a great way to develop the narrative of a story and work out any gliches in framing or camera movement as well as special effects.
Week 8 - Learning JavaScript
I am currently learning from these four pieces of documentation:
Adobe Photoshop CS5 -Javascript Scripting Reference (used for this blog)
http://www.adobe.com/content/dam/Adobe/en/devnet/photoshop/pdfs/photoshop_cs5_javascript_ref.pdf
Adobe Photoshop CS5 - Scripting Guide
Adobe -Introduction to Scripting
Adobe Creative Suite 5- Javascript Tools Guide.
To learn a subject, one has to take responsibility for learning the subject.
JavaScript functions with specific naming specifications for its classes. For example, if I made a class in JavaScript for Photoshop, this would be the first line:
new EditLayers( );
This line begins with the type new. The documentation refers to this as an operator. Perhaps it just means that the "new" type is letting the class operate as a recent not already catalogued device.
This website conveys it in a nutshell: ttps://developer.mozilla.org/en/JavaScript/Reference/Operators/Special/new.
A "new" operator develops a copy of the kind of object that the user has just set up within JavaScript.
Using already established objects is a little more complicated. Photoshop has its own Photoshop Object Model. There are a groups of objects. Each object is called a container and has a subgroup within it that are "subobjects". These objects can be called within JavaScript code similar to the way that one would call an array.
layer.documents[1] or
documents[5]
Layer in the above example is a variable, which can be used to call documents, the name of a specific subobject in JavaScript. Subobjects can have many different names. To call a subobject, make sure that the object name's first word is not capitalized and the second word is capitalized.
Methods are always actions of somekind, which I learned in my Java class least semester. One can develop completely new objects within the subobjects by using precreated methods to manipulate an object.
Although some objects such as fonts are definite and binding, and therefore cannot be manipulated.
From this documentation, I observed that var is the type used for variables in JavaScript.
Thursday, March 17, 2011
Week 8- Introduction to Photoshop Scripting
Photoshop scripting will provide me with a better understanding of Photoshop in general. It is possible to script in three different languages to change aspects in Photoshop, although they are specific to certain platforms like Windows or MacOS.
AppleScript works only with Apple computers, hence the name, and contains the file extension (.scpt).
VBScript works only with a Windows Operating System. Its file extension is (.vbs).
JavaScript can work on both Apple or Windows. It has the file extension .js or for ExtendScript (.jsx). Javascript files should always be displayed from within Photoshop because that is the only way to view them using Photoshop. Trying to open them from a folder won't bring Photoshop up. The Photoshop scripting manual recommends providing JavaScript files with the formatting of (.jsx) due to the capabilities of ExtendScript.
Visual Basic is a similar to a regular program file. It is can be loaded whereas the other formats are text only, with the exception of AppleScript, which will only run once it is compiled.
Given all these formats, the one I will try to use the most will be JavaScript or ExtendScript, but just in case I would work on a project on a Mac, I will experiment with the others as well.
The way to locate scripts in Photoshop is to go to File--Scripts. A list of the scripts that have been made can be displayed in the Scripts dropdown panel only if they are saved in Photoshops CS5 --- Presets---Scripts on the computer. Only the saved name of the script can be displayed in the dropdown. Unfortunately, users can't add scripts to Photoshop will it is in use, but they can be added if one restarts Photoshop. The Browse function under the Script dropdown is great if scripts are in a different location than the Script folder. Browse makes JavaScript files available for importing.
This documentation is what I am currently reading to learn about Photoshop scripting. It is the source of my information for this blog post.
http://www.adobe.com/content/dam/Adobe/en/devnet/photoshop/pdfs/photoshop_cs5_scripting_guide.pdf
Week 3- Lighting in Maya
The following tutorial provides that to light a scene, an experiment with generic objects is necessary.
http://www.halbstein.com/tutorials/lights/lightPages/lightOne.htm
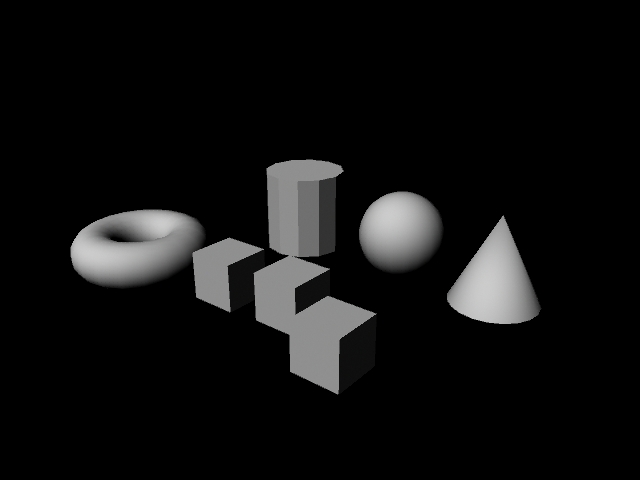
This is the render frame before adding any lighting. I put white lambert shaders on them to keep track of any strange color occurrences.

To view more than one window at a time and create a better work flow, one can find a specific group of windows under Panels in the workspace window, Saved Layouts. Lights in Maya are under the Create, and Lights menus, which I discovered from the Maya Documentation. By pressing any of the following keys: qwert, we can access the movement tools in Maya.

I used a spotlight as in the tutorial. I also pressed 3, 5, and 7 as the tutorial directed to create the highest resolution. It will also shade the objects to their maximum potential, including the spotlight and shadow in the frame.
There is a lot more to this tutorial, which I wasn't aware of, so I will continue the learning process on my own.
http://www.halbstein.com/tutorials/lights/lightPages/lightOne.htm
This is the render frame before adding any lighting. I put white lambert shaders on them to keep track of any strange color occurrences.
To view more than one window at a time and create a better work flow, one can find a specific group of windows under Panels in the workspace window, Saved Layouts. Lights in Maya are under the Create, and Lights menus, which I discovered from the Maya Documentation. By pressing any of the following keys: qwert, we can access the movement tools in Maya.

I used a spotlight as in the tutorial. I also pressed 3, 5, and 7 as the tutorial directed to create the highest resolution. It will also shade the objects to their maximum potential, including the spotlight and shadow in the frame.
There is a lot more to this tutorial, which I wasn't aware of, so I will continue the learning process on my own.
Week 3- Mel and Script Editor Help
Learning about Maya is interesting and entertaining. I am now developing the tools to help myself through the Maya Interface more efficiently.
Through this tutorial, I discovered some valuable knowledge about new ways to program in Mel.
http://www.cgsutra.com/autodesk_maya_tutorials/mel/chapter_02/ch02_script_editor.php
The Command Shell is a window that one can program in, related closely to the "input" window in the Script editor. When a line of code is written and submitted for processing, the "Result" line is displayed right underneath the command.
The History menu within the Script Editor is extremely efficient.
1. Batch Render Messages - has a Script Editor display.
2. Echo All Commands -all the commands and their results show up in the history display in the Script Editor.
3.Show Stack Trace- for script files loaded into Maya from another source, this option shows the script and any errors it has along with numbered lines.
4. Suppress options - customize the feedback in the history window of the Script Editor.
The Command menu in the Script Editor is awesome for accessing fast documentation or flags for a command with the Quick Help option. A new tab can be made in either Mel or Python for a number of purposes, like to have additional scripts open, notes, or to dock feedback quickly from the history window.
If you need flags that are related to a certain command, you can access Quick Help by right clicking and going to Quick Help. One can right click over a flag and open the Command Documentation. The Help Menu for Maya is great and I will be exploring it fully.
I typed -r into Quick Help and was provided with this information:
How to use the "help" command:
To get quick help for a particular command, type:
help <commandName>
To get in-depth documentation for a particular command, type:
help -doc <commandName>
To get a list of all available commands whose names match a pattern, type:
help -list <regular expression>
For example, to show all commands starting with the letter "b", type:
help -list "b*"
To go to the general on-line documentation, use the Help Menu, or type:
help -doc
//
In addition, Mel scripts function in the Python window of the Script editor but to "initialize" Mel, this line of code is necessary.
import maya.cmds
This is to access all the Maya commands (cmds).
Wednesday, March 16, 2011
Week 3-Working with Components in Mel
This website has some thorough tutorials about Mel that really breaks the steps down and makes them easy.
http://www.mayavideotutorial.com/maya-scripting/maya-embedded-language/start-mel-2.html
I will demonstrate the concepts just with a different object to get practice. The author of the tutorial did this all in the Command Line of Maya, not the Script Editor.
First, the correct way to set up a script for working with components in Mel is to:
1. Select them.
2. Add the flag -r.
3. Include the name of the object.
4. Call the name of the object like it is a function
by including a period after the name.
5. Write the first letter of the component you are accessing.
6. Treat it like an array of components and you are accessing a specific component,
so provide a number within the brackets.
For example, I typed in polyCylinder; into the Maya Command Line and hit the number panel Enter Button.
It produced this result.

I then worked with a face of the cylinder.
select -r pCylinder1.f[2];
The object turned completely gray and selected the specific face.
I then decided to move the face that I selected with this code: move 2 2 2;.

Accessing Components through Mel seems easy and very important to include in my studies later on.
Week 2- Mel Commands Tutorial
In the Shelf menu, directly below the Status Line, a Maya user can save a script to bring it up conveniently later on. One way to accomplish this is to drag the highlighted code to the shelf area using the middle mouse button. Another way to accomplish this is to bring up the Script Editor and click File, then Save Script to Shelf.
This tutorial discusses how to attribute the manual commands and functions in Maya to the programmable ones in Mel. http://www.cgsutra.com/autodesk_maya_tutorials/mel/chapter_03/ch03_mel_command.php
1. Create sphere manually.
- Create ---Pologon Primitives---Sphere Options Box
2. Mel code
polySphere -r 1 -sx 20 -sy 20 -ax 0 1 0 -cuv 2 -ch 1;
// Result: pSphere1 polySphere1 //
3. Breakdown of Script (directly related to the Sphere Options Box)
- polySphere is a command to create the sphere object.
-r = radius
-sx = smaller increments of faces within the sphere along
the x-axis
the x-axis
-sy = smaller increments of faces within the sphere along
the y-axis
the y-axis
-ax = modeling axis for object- three dimensions follow it.
-cuv= create uvs - takes a value of 1 or 2- 1 is related to pinched
at the poles function and 2 is related to sawtooth at the
poles function.
poles function.
-ch construction history button on or off.
The first line of code will work if the names of each flag are written in the extended format like -axis for -ax.
Mel contains three options for writing commands. The first, create, is used normally. The second, query, is to "inquire" about a certain piece of information about a produced object. The third, edit, can change the properties of any flag.
This is the code I experimented with and is also shown differently in the tutorial:
polySphere -query -axis;
// Error: No object was specified to query //
select -r pSphere1 ;
polySphere -query -axis;
// Result: 0 1 0 //
It turns out that I didn't have the sphere selected before I wanted to get information from it.
Operators work the same way in Mel as they do in regular math. Except that they are connected to types in Mel such as Integer, Floats, Vector, String, and Matrix. There are three operators such as binary, unary, and ternary. Binary operators must have two operands: $h>3, which would be $h and 3. Unary must have one operand : $h --, which is $h. Ternary related to true and false from the example in the tutorial, however, it was confusing.
Operators work the same way in Mel as they do in regular math. Except that they are connected to types in Mel such as Integer, Floats, Vector, String, and Matrix. There are three operators such as binary, unary, and ternary. Binary operators must have two operands: $h>3, which would be $h and 3. Unary must have one operand : $h --, which is $h. Ternary related to true and false from the example in the tutorial, however, it was confusing.
Tuesday, March 15, 2011
Week 2 - Maya Interface
The Maya Interface is somewhat familiar to me, but I don't know everything about it. To be able to write successful scripts in Mel, a basic understanding of Maya and how it generally works is necessary.
http://www.expertrating.com/courseware/MAYACourse/Maya-Interface-1.asp
This website has a great rundown of the Maya Interface, which I will briefly discuss here. It is Maya 6.5 but the same principles seem to apply to the 2011 version. The above website has a lot of tutorials about subjects concerning Maya that I never knew about before. This is exciting.
The first bar located near the top of Maya is the Menu Bar. The second bar underneath it is the Status Line to display the framework in which one is working To switch between the frameworks on the Status Line, which effects the additional dropdown menus on the menu bar and Status Line, use Hot Keys.
Hot Keys(2011):
F1: Load Maya Help.
F2: Animation Framework
F3: Polygons Framework
F4: Surfaces Framework
F5: Dynamics Framework
F6: Rendering Framework
F8: Toggle between Select by object or component type
F9: Select by component type-points
F10: Selects point, line, and face components
F11: Selects by component type-faces
F12:Selects points, parm points, and face components
All the menu dropdowns can be changed into separate windows within the Maya interface if one clicks on the dashed line at the start of each menu. The UI elements can be shown or disappear off-screen by checking or unchecking the box under the Display and UI elements menus. The collapser divider tabs help items on the Status Line show up and disappear as well.
The purpose of the Status Line is to control the type of selections made with Maya. There are three types of selections in the Status Line: Hierarchy, Objects, and Components. Depending on the option, actions accompany them to the right and help the user make a specific choice about what they want to see and do with models they've created. Hierarchy selection refers to highlighting a parent or child object. The Lock Selection prevents any other selection. To the right is the Highlight Selection button, which if it is turned on, will highlight an object in the workspace light blue, or if turned off will keep the object gray.
Snap to buttons are great to prevent unnecessary movement of an object or component. To control the way objects are put together, select the Input to and Output from object buttons. The Construction History button keeps track of changes to the object. Render buttons are also available which will make my job a lot easier.
These include Render View, Current Frame Render, IPR (Interactive Photorealistic Render) and Display Render Settings Window. The Numeric Input tool in Maya 2011 has four functions(Absolute Transform, Relative Transform, Rename, Select by Name). I have worked with the first two, but never realized the convenience of the second two operations.
This tutorial is lengthy so I will continue the learning process on my own.
http://area.autodesk.com/blogs/stevenr/maya_2011_highlight_qt_user_interface
This tutorial or demo discussed how to create fuctions using Qt (see below) to make the UI specific to how you want it to work. I learned from this video that windows can be docked and undocked and moved around within Maya. So windows can be placed wherever the user pleases.
Qt is a program that can help Maya users create useful features in the UI (User Interface) for Maya 2011.
http://qt.nokia.com/products/
Monday, March 14, 2011
Week 2 - Mel Introduction
In week 2, I researched some information on Mel.
Here was a helpful website: http://www.kevinwafer.com/melscripting/index.html.
Mel is Maya's personal programming language which works independently of any compiling system. Maya takes a while to process the information, but constructing an already processed plugin that runs in Maya would alleviate that issue. Mel can facilitate the change of existing functions in Maya, which I was not aware of and sounds rather difficult. But I will investigate it further to learn how to use Maya more efficiently.
The script editor can be accessed at the lower area to the right of the Maya interface or under the Window and General Editors menus. Above this is the Animation Preferences icon. Appropriately, it is near the "command feedback window" which gives the result of all processed Mel code in Maya, which we learned in class. To the left of the "command feedback window" is the "Command line" to actually construct Mel scripts in just a smaller form. The author claims that the Command line can assist in beginning to write a block of code or an individual line. I tried putting the entire code for my RGB Color Wheel into this area and it still worked.
To send the constructed code to be processed, the author of this web page suggests to look under the Script menu within the Script Editor, which is not included in my version of Maya. Instead I found a menu called Command, which has the option Execute and has the hotkey listed as Ctrl + E. Other options include pressing Crtl + Enter or Enter next to the numbers panel on the right side of the keyboard.
The system or process that one has for constructing Mel scripts is important.
Here is a suggested process:
1. Know what the script will create.
2. Create a list of necessary steps to complete this and a list of goals to have when creating it. (Each section of code necessary for the script is called a procedure.)
3. Test individual procedures and once they function, combine them.
The rest of the tutorial is examples of scripts, which I can keep for further use and may come in handy for later situations.
Sunday, March 13, 2011
Week 7-Simple Texturing in Maya
This video on texturing had unsynced audio and video. I will find another source to get information about Maya from now on. Nonetheless, it did give me valuable information that I have been lacking.
1.Create the certain material that you want to use by clicking on it in the Hypershade window.
2. Double click on the material and a list of attributes will appear, which can be changed.
3. Click on the checker box on the right side of a specific attribute to choose a texture (many options-2D for this example).
4. Keep the one of the top settings set to Normal.
5. Tweak the attributes provided like color and contrast, etc. A note section is also provided for people in a groups who need to communicate.
6. Put texture on model (3 ways):
-- Use middle mouse and drag over the model from the Work Area of the Hypershade window.
-- Use right click --- Assign material to Selection.
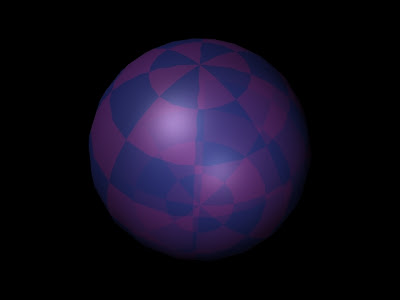
I created this Blinn texture with the procedure described above. I changed the some of the attributes associated with it.
The functions of shaders are different from textures in that they are necessary for any textures to be applied to a model. There always have to be two layers to any successful texture mapping. Textures are bound to shaders, which in turn are bound to the specific model. Shaders are colors. There are shading networks which were vaguely discussed and which I will find out more about later. Textures can change and adapt in many ways based on the options of attributes, such as ambient color and transparency, etc. These attributes are called channels.
Steps to texturing a model:
2. Double click on the material and a list of attributes will appear, which can be changed.
3. Click on the checker box on the right side of a specific attribute to choose a texture (many options-2D for this example).
4. Keep the one of the top settings set to Normal.
5. Tweak the attributes provided like color and contrast, etc. A note section is also provided for people in a groups who need to communicate.
6. Put texture on model (3 ways):
-- Use middle mouse and drag over the model from the Work Area of the Hypershade window.
-- Use right click --- Assign material to Selection.
-- Use right click --- Material --- Assign existing material ---Texture name.
7. Turn texturing on with hot keys (or texture button which I already knew about).
-Hot keys
4: Wireframe
5 : Shaded
6 : Texture
I created this Blinn texture with the procedure described above. I changed the some of the attributes associated with it.

I watched this tutorial:
Week 7-Hypershade tutorial
In this tutorial, I learned about the process of starting to create a texture or shader for objects in Maya. The audio wasn't synced with the video, but I learned a lot and it was exactly the knowledge I needed. It was a brief introduction to the Hypershade window.
The version of Maya used in the tutorial looked like Maya 2010. I still thought it would be helpful even though I have Maya 2011. The narrator located the Hypershade button in Maya 2010 to display the Hypershade window in the left hand side of Maya underneath all the movement commands. However, I located the Hypershade window in my version under the Windows Tab on the menu Bar, under Rendering Editors, and Hypershade.
I noticed another difference between Maya 2010 and 2011. In 2010, the Hypershade window was called Hypershade/Perspective. In 2011, Hypershade has its own window and Perspective is paired with UV Texture Editor.
The tutorial demonstrates the layout of the window. One can choose a node of surfaces or shaders, and textures, among others, to develop on the left panel. Some of these include Anisotropic, Blinn, Lambert, Layered Shader, Phong, Phong E, and a Ramp Shader. I knew before that different materials could be accessed within this window, but all I knew how to do was change the color. The recent materials are located in the top right-hand box and the work area is in the lower right-hand box, where the changes made to the material appear including the links of the layers for the material.
Different textures and shaders are unique based on their ability to reflect light, what the narrator calls Specularity. An Anisotropic surface material is common for hair texturing, where the light takes on a curved quality. Blinn materials have light that is distributed and looks more dull than the Anisotropic material. It is recommended by the narrator to use for metal objects in Maya. A Lambert is defined as a mundane shader with barely any light relection and can be used to shade things such as human skin, grass, or carpet, among other things. A Layered Shader is one that contains materials stacked right on top of each other. Phong and Phong E can be implemented for plastic or glass-like objects and have significant light reflection. Phong E is related closely to the Blinn material. Lastly, a Ramp Shader provides the option of a self-made color palette to attribute to an object. The attributes of these materials can be tweaked within the Attribute Editor, which I already knew.
This website has the tutorial I watched.
http://vimeo.com/754556
Saturday, March 5, 2011
Assignment 3: 3/5/2011
RGB Color Cube

The above RGB Color Cube was created with the following code:
string $name;
string $tmp;
for ($x=0; $x<8; $x++)
{
for ($y=0; $y<8; $y++)
{
for ($z=0; $z<8; $z++)
{
$name = `shadingNode -asShader blinn`;
$tmp = $name + ".color";//blinnShader1.color
setAttr $tmp -type double3 ($x/7.0) ($y/7.0) ($z/7.0);
polySphere -ch on -o on -r .03;
xform -translation ($x/7.0) ($y/7.0) ($z/7.0);
hypershade -assign $name;
}
}
}
RGB Color Wheel
$numHues = 6.0;
$w= 360.0/$numHues;//width
$s = 1.0/10.0;
$value = 1.0;
$n = 6;
for ($i=0; $i<$numHues; $i++)
{
for($j=0; $j<$n; $j++)
{
$sphere = `polySphere -ch on -o on -r .3`;
move 10deg 0 10deg $sphere;
xform -r -ro 10deg 0 10deg;
$sat = $j * $s; // translate by number
$angle = $i * $w; //rotate ball
$hue = $angle/360.0;
//vector $v = <<1, 2, 3>>;
//shadingNode -asShader blinn;
//sets -renderable true -noSurfaceShader true
// -empty -name blinnSG;
//connectAttr -f blinn.outColor blinnSG.surfaceShader;
//assignCreatedShader "blinn" "" blinn "pSphere";
//sets -e -forceElement blinnSG;
//vector $c = hsv_to_rgb($v);
//xform -translation ($c.x) ($c.y) ($c.z);
//hypershade -assign $name;
}
};
I have worked and reworked this code so many times and I don't understand it.
Artistic Color Wheel
$w= 360.0/6;//width
$s = 1.0/2.0;
$value = 1.0;
//string $sphere [];
//$sphere = `polySphere -ch on -o on -r .5`;
$a1= 0.0;
$a2 = 60.0;
$h1 = 0.0;
$h2 = 60.0;
//$angle = $w / 6;
$n= 10;
$dhue = $h2 - $h1;
$sh = $dhue/$n;
$dangle = $a2 - $a1;
$sa = $dangle /$n;
$hues[];
$hues[0] = 0;
$hues[1] = .16;
$hues[2] = .32 ;
$hues[3] = .48;
$hues[4] = .64;
$hues[5] = .8;
$hues[6] = 1;
// $hues []= { 0,.16, .32, .48, .64, .8, 1}
for ($k=0; $k<6; ++$k)
{
$dhue = $hues[$k + 1] - $hues[$k];
$dangle = $hues [$k + 1] - $hues [$k];
for ($i=0; $i,6; ++$i)
{
for($j=0; $j<6; ++$j)
{
$ca = $a1 +$i * $sa;
$ch = $h1 +$i * $sh;
string $sphere [];
$sphere = `polySphere -ch on -o on -r .5`;
move $sphere 10deg 0 10deg;
xform -r -ro 10deg 0 10deg;
$sat = $j * $s; // translate by number
$angle = $i * $w; //rotate ball
$hue = $angle/360.0;
vector $v = <<1, 1, 1>>;
shadingNode -asShader blinn;
sets -renderable true -noSurfaceShader true
-empty -name blinnSG;
connectAttr -f blinn.outColor blinnSG.surfaceShader;
assignCreatedShader "blinn" "" blinn "pSphere6";
sets -e -forceElement blinnSG;
vector $c = hsv_to_rgb($v);
xform -translation ($c.x) ($c.y) ($c.z);
//hypershade -assign $name;
}
}
}
I understand the basic concepts from class such as the color wheel divided into 6 parts. But no matter what I can't get the code to work. My classmates, Casey and Rachel, gave me some advice about how to fix the problem, like including these lines in the saturation for loop:
string $sphere [];
$sphere = `polySphere -ch on -o on -r .5`;
and not using xform translation or adding angles.
I understand the basic concepts on paper, but coding them into Mel is confusing. Documentation is not always helpful. I will be getting a tutor immediately.
Subscribe to:
Posts (Atom)